Updated 3/27/2018: Updated with real world numbers at the bottom.
Being connected on the road is one of the most important things many full time RVers and travelers require. It is especially important for those of us who work from remote locations, but even those who don’t work still like to stream video and music. Cell signals can vary greatly and all to often deviate from the maps that the providers post on their websites. We all want to be connected somehow, and with the SureCall Fusion2Go RV 2.0, that can be achieved.
 There are two main competitors in the area of cell signal booster for RVs. I was able to get the SureCall Fusion2Go 2.0 RV Cell Phone Signal Booster Kit
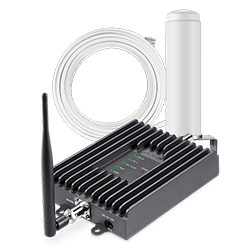
 for review. As a whole unit, this device is great. Its not terribly large, it comes with an omni antennae that can be connected to a pole or ladder, and is DC powered so it can be plugged into a standard cigarette lighter in the RV and placed wherever your cell modem or phones may be.
First, a little explanation of how this works. Basically, a cell booster just amplifies the signal from nearby towers. If you are somewhere so remote that you get no signal at all, this won’t help. However, sometimes there is a signal so weak, that even though it shows no bars on your phone, the Fusion2Go may still have enough of a signal to boost to at least get some sort of connection. It has two antennas, one outside for connecting to the tower, and another inside for connecting cellular devices in range. The larger, white antennae is mounted to the outside of the RV, somewhere as far away from the internal antennae as possible. It is also omni directional, so once it is installed, you never have to touch it again. A cable is then connected to the booster itself, which will be inside the RV. The booster then has an internal whip antennae that broadcasts its boosted signal to the cell devices inside.
Note: Cell boosters DO NOT increase wifi speeds. Wifi is a short range communication to the internet. Bad wifi in a campground will not be affected by the Fusion2Go at all, only cell signals like that from a hotspot or smartphone will be boosted.
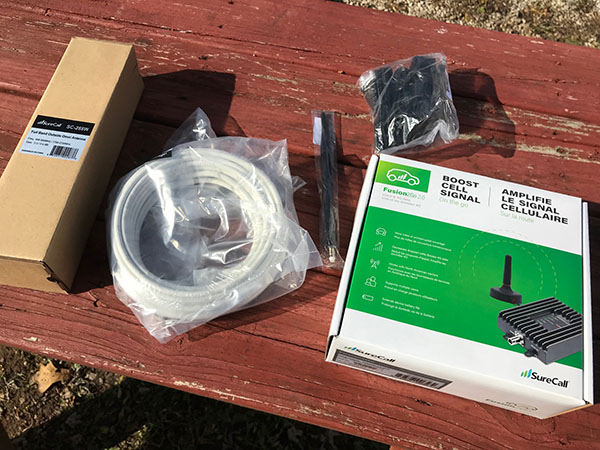
Whats in the box?
The box came packed full, but some of it was items that make this an RV kit, as opposed to just a car kit.
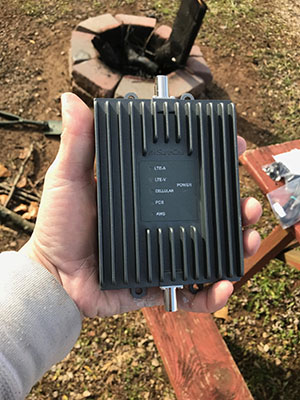
There is the Fusion2Go itself, which is surprisingly small and light. It feels solid though with its metal casing and the craftsmanship is superb. Everything appears to be put together well and tight, and the whole thing feels solid.
In the box with the booster there is an antenna on a cable, a standard cigarette lighter power plug, and a small antennae with a magnet. If you are using this in an RV, the only part besides the booster that you will possibly use is the cigarette power adapter, and even that you may not need. When we installed ours, we used it though so that it will work even without shore power.
Alongside the booster box was a larger, omni directional external antennae with mounting bracket, a 40 foot cable to connect the antennae to the booster, a whip antennae for inside the RV, and an AC power adapter. There are also screws for mounting the booster and a U-bracket for attaching the omni antennae to a pole.
Everything in the box…
…versus everything we are using.

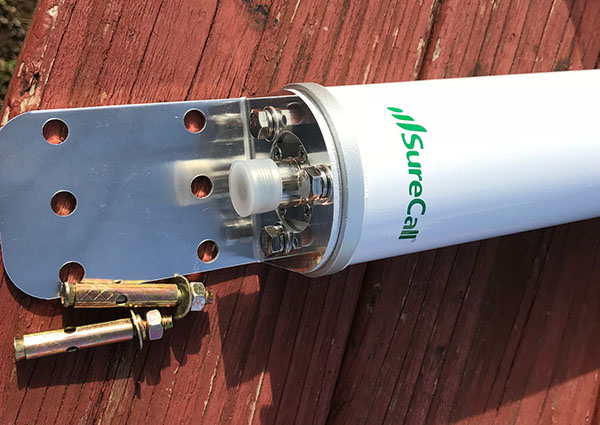
The antennae feels as solid and as well constructed as the booster. It has three bolts on the underside to mount to the bracket. The 40 foot cable should be more than enough for almost any RV, when we were done with the installation, we only needed about half of it. The whip antennae seems to be like any other antennae of that type and the AC adapter is pretty self-explanatory.
There is also a quick setup guide, more serial number stickers, and paperwork to contact SureCall if you have problems with your setup.
Installation
Before you begin, figure out where everything is going to go. Its probably easiest to find somewhere to put the booster and then figure out where to put the antennae. You want the booster as close to your hotspot as possible. We chose to put the booster in the back where there is a DC powered outlet so we can still use the booster and modem when not plugged into shore power. Your RV will be different though, so find a spot for your modem, make sure there is space for the booster, and then find somewhere as far away as possible for the omni antennae.
Now then, the installation. Let me come right out and say it: This is not difficult at all. You can do it all with a power drill and a couple sockets (11mm for the bolts connecting the antennae mount to the RV, 3/8″ for connecting the mount to the omni antenna). That’s really it.
Step One: Connect the antennae to the mounting bracket. There are three bolts with lock washers and normal washers on the bottom of the antennae along with a screw-on connection for the cable that goes to the booster. First remove the three bolts, line up the holes on the metal bracket and then tighten the bolts back on. With the inclusion of the lock washers, you should never have to worry about it coming loose.
Step Two: Attach the mounting bracket to the RV as far away from the booster as possible. You don’t want the inside and outside antennas interfering with each other, so put as much distance you can between them. I had to borrow a ladder because I did not want to hang over the edge of the RV with a drill, but it was still pretty easy. Except for one little problem.
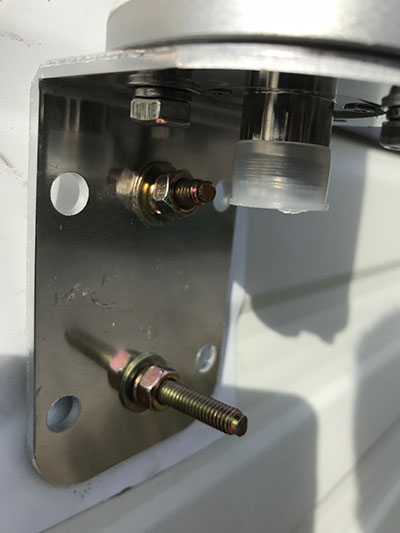 I assume that the reason there are six holes on the mounting bracket is because the center two are for mounting with bolts onto a surface, and the four outside holes are for mounting to a pole with the included U-bracket. There is one little problem with those center holes though. If you use the included toggle bolts and try to tighten them all the way, the top bolt will run into the screw-on connection for the cable going to the booster. I could not figure out anyway to tighten it enough to hold without moving and without running it through the cable connection. So having realized that method wouldn’t work, I decided to just use the pole mount instead, covered the holes I had made with a bit of Eternabond, and moved on.
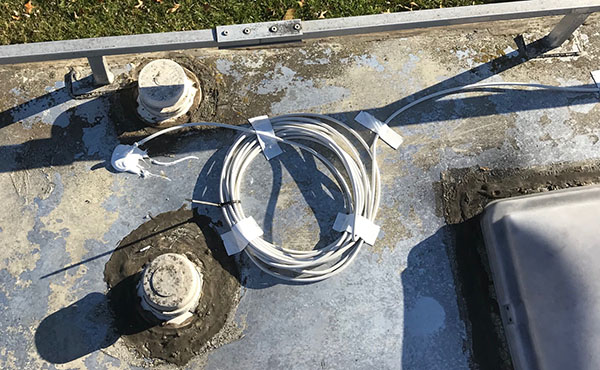
Now on the roof, I used the pole mount to attach the omni antennae to the luggage racks that are on the RV. We could have added a pole mount and put it a bit higher, but since this was already there we used what we had. I’m not sure an extra foot of clearance would make much difference anyway and it would change the height profile of the RV as well.
The pole mount is simple to use. Two U-brackets on one side, two metal braces for the opposite side of the pole, then the antennae on the bracket, and finally the washers and nuts. Again, with the included lock washers, you shouldn’t have to worry about them coming loose and it is easy to tighten them. With no delicate electronics in the way, crank down on these as hard as you can. I actually caused the U-bracket to bite into the aluminum a little bit, but it won’t ever move now.

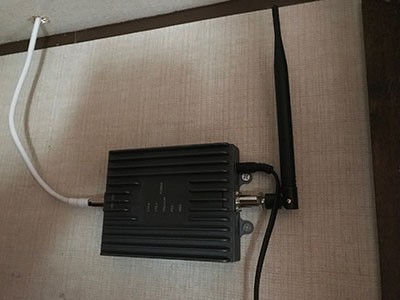
 Step Three: Now we move inside the RV. In the place where your modem is, place the booster. It doesn’t have to be screwed in, but its much easier to deal with if it is. We mounted ours to an internal wall inside a cabinet. As I said, since the cabinet has DC power from an old TV, we used the DC adapter for power. There are four tabs with holes on the sides, two on each, and there are screws to attach it to the wall. Since the booster is so light, its easy for one person to mount it in a few seconds. With the booster mounted, I screwed in the whip antennae. There are antennae ports on opposite sides, both clearly labeled.
This is where the second odd thing came up. There are LEDs and descriptions for what they mean on the center of the booster. It would make sense to have those upright so it was easy to read at a glance. However, if you mount the booster upright, the internal antennae points down. Flip it over so the whip antennae points up and now the writing is upside down. We got around this by installing it sideways, so the writing is still easy enough to read and the whip antennae has a joint so it can be turned to point up. Not a big deal, but it would be nice if it was designed to mount sideways.
Step Four: Connect the outside antennae to the booster. There are many ways to get the cable from the roof to the booster. Some owners don’t want to damage their RV permanently so one option is to go in through the vent for the refrigerator if its close to the booster. If you have solar installed, it might be easy to run the cable through the holes with the solar cables. If you don’t have either of those options, then the easiest way is to just drill a hole in the roof, which is what we did. There are three layers to our roof, but I drilled through them and made a hole as small as possible to fit the cable. I then went back on the roof to feed the cable through the hole with a little help from my wife on the inside.
Once back inside, I connected the cable to the external antennae port on the booster. I had two options with the extra cable, inside or on the roof. Since I had a lot leftover, I chose to coil it up on the roof and secure it there. I also zip-tied the cable to the same pole the external omni antennae was mounted to, just to get remove any fear of it moving even a little. I used small pieces of Eternabond to adhere the cable to the roof, and coiled it up near the hole to the booster. Finally, I covered the hole in a lot of Dicor sealant to make sure nothing leaked in. Since Dicor is self-leveling, it did sink a little into the hole, but after I finished working on other stuff, I came back and put another glob on to be safe.
I know, I know! The roof looks terrible. Once all the wiring is done for the Smart Home on Wheels series, we’ll be painting the top and covering up everything. And replacing the vents and resealing them with Dicor.
Step Five: Power! This part is easy. There is a port on the booster for power. Plug in either the AC power brick or the DC cigarette lighter to that port. Then plug in the other end to the power source. Finally, there is a switch on the power adapter. Flip that on, a light will show up on the switch and the lights on the booster will start flashing. When they are done flashing, it should work fine. That’s it. Really, that’s all there is to it. The booster will now do its job and boost the cell signal of anything in range. You don’t have to login and set anything up. There is no software to install or manage. When it has power, it boosts. Pretty simple!
Base Speed vs Boosted Speed
So how good is this thing? First of all, I’d love to give you specific numbers with our hotspot. We normally use an ZTE Mobley on AT&T’s network, which usually is pretty reliable. However, where we are now the Mobley gets no signal at all. We’ve moved it all over the RV trying to find somewhere that it could pick up something, but it had been pretty useless up to this point.
Then add in the Fusion2Go. It worked very well. When we turned the Mobley on, not only did it connect, but it was receiving three bars. When I logged into the admin of the Mobley from my laptop, it was getting three bars and -106 dBm (I’ll explain this in a bit.) One caution though, if you have absolutely no signal at all, no booster is going to help. The hardware needs something to work with, even if its a tiny signal so small your device can’t get it on its own. We are lucky that we are somewhere AT&T just barely reaches, so when boosted its not great, but it is much better than before.
We also have iPhones on T-Mobile’s network. For some reason, T-Mobile has better coverage here than AT&T does, which almost never happens. We usually get around two bars, sometimes three, but that’s about it. For actual numbers though, when the iPhone is at the front of the RV and about 25 feet from the booster, we get one bar. In the back, about three feet away from the booster, we get four bars. I would love to tell you what the dBM is for an iPhone, but something with the iOS 11 update changed the way it displays the dBm and I can’t seem to find a reliable way to determine it.
As for dBm, that is a measure of signal strength. dBm can go from -60 to -110, with -60 being the strongest signal and -110 being almost worthless. Since we went from nothing to -106, that’s a huge improvement. We couldn’t connect to anything at all through the Mobley before, and now with the booster, while its still far from fast, its much better than tethering our phones and at least enough to stream some videos through.
The key though, is having the hotspot as close to the booster as possible. When you are placing your booster in your RV, keep in mind that the hotspot needs to be near it as well. If you are the type to use your phones and don’t have a hotspot, then place the booster somewhere that is close to where you normally use your phone.
Boosting Range
The boosting range can really only be measured in a couple of feet. It would be nice to have the whole RV covered, but I don’t think any cell signal booster is capable of that. For boosting the signal of a hotspot that never moves though, it is invaluable. Since the hotspot never needs to move, mount it next to the booster and forget about it. No matter what carrier you use, the SureCall Fusion2Go will boost the signal and give you increased speed and a more reliable connection.
Final Thoughts
At Amazon, the Fusion2Go RV costs about $430. If you are the type of person that requires a cell connection all the time, it is worth the cost. As long as you are somewhere that has even a mediocre cell signal, it can improve it to useable speeds. If you have even a little ability to do some manual handyman work, it is simple to install. Like I said before, its just mounting the antennae outside, connecting it to the booster inside, and you are done. There is nothing to do beyond that, you don’t have to go in and tweak any settings. You really just turn it on and let it do its job. That’s about as simple as it can get.
We have the benefit of using an older RV for the Smart Home on Wheels project, so we aren’t worried about drilling holes in anything or mounting things permanently. The whole goal is to make this unit a mobile workstation, and with the SureCall Fusion2Go RV 2.0, we move closer to that goal. If you are nervous about doing permanent damage to your RV, I suggest mounting the booster in a closet and run the antennae cable through a vent to the roof. It also came with some velcro so it can be attached semi-permanently if you think you might need to move it later. If you plan on upgrading to a new RV and selling your old one though, it might be beneficial to have a permanent cell booster installed.
The booster itself is really small and barely increases in temperature when using it. We’ve had it plugged in for about six hours now, its slightly warm, but nowhere near hot. The front of it has a series of grills that work as a heatsink to keep it cool. If I can find my laser thermometer, I’ll update with an exact temperature. As is, its fine to touch, just barely warm and not dangerously hot at all.
Update: Feb 2018
We are currently in Florida on the Atlantic coast. We were having issues with the cell coverage here. While installing a satellite dish, I must have nicked the DC power cord that the Fusion2Go booster was plugged into. Because of that we had no power to it. I was using our Mobley and the speed was horrible. I checked the dBm and it was coming in at -114dBm, which is pretty bad to the point of not being useable. Since I’m unable to fix the DC power at this time, I opted to plug in the AC adapter for Fusion2Go. We jumped up to -88dBm, which is an incredible improvement. I’ll have to work on figuring out the power issue, but for now, using AC power for the Mobley and Fusion2Go works well. The difference in speed has been great.
Update: March 2018:
We are currently in Alabama. Our internet was very poor for the past few days and I couldn’t figure out why. Our connection was registering at -109 dBm, which is pretty damn bad. I went to the cabinet where the modem is, trying to orient it towards the cell tower, hoping that I could get a better signal if I moved it around and got the antenna situated correctly. Then I noticed there were no lights on on the cell booster. I plugged it in and it kicked in almost immediately. The signal jumped up 30 points to -84 dBm, which is not perfect, but pretty nice considering what it was without the booster plugged in. I’m not sure when it got unplugged, but it was not on purpose. We are getting some power cords to be able to plug in the booster and modem through AC power, so there will be more outlets available in the future. For now though, its a tangle of cables and needs to be cleaned up.
More Information and Where to Buy
You can purchase the SureCall Fusion2Go 2.0 RV from Amazon through our affiliate link.
For technical specifications, please see Surecall.com. There you can find the owners manual as well.
Click here for more detail on our Mobile Internet Setup.
I received the SureCall Fusion2Go 2.0 RV for review from the manufacturer.
[…] a hotspot and need it boosted, put it right next the booster inside the RV. I did a review of the SureCall Fusion2Go 2.0 RV and it was very easy to […]
[…] cell booster is invaluable. I did a review of the SureCall Fusion2Go RV 2.0 and it has saved us many times. Its a bit more expensive than some of the stuff on the list, but […]
[…] on that, but AT&T and T-Mobile signal were pretty good at the top of the hill. We have a cell booster as well, and that made our data connection pretty good. We didn’t have a problem with dropped […]
[…] see how to install the Fusion2Go, go to our previous walkthrough of the installation of the 2.0. Nothing in the installation has […]