
I received a rear view camera from Tadi Brothers to install myself and review. It was not difficult, seems to work fine, and has a clean, clear image that is easily wide enough for our needs. I don’t back up the RV often, but when I do, its nice to have a picture of what is going on behind the RV so I don’t hit anything. Read below for the steps to install it all, how it all works, and what to look for when doing the installation yourself. If you are not comfortable crawling around the underbelly of your RV or drilling holes in walls, this might be above your skill level, but all in all, its not difficult.
 |
 |
 |
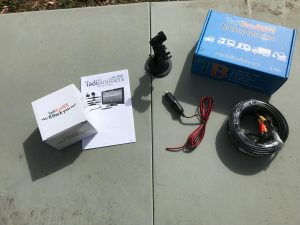
In the Box
First off, the parts in the box. There is the camera itself and mounting hardware with connected cable for power and video feed. Then there is a long cable to connect the camera to the monitor and transmit the image and power the camera. In a box by itself is the monitor, in our case a 7″ screen with a mounting bezel for putting it in the dash, as well as two mounts for either attaching it externally to the dash or hanging it from above the windshield. There is the cable harness for the monitor and a standard cigarette lighter outlet for DC power. There are also instructions for installing the whole system. Finally there is a small remote with battery. That’s it.
Because we are mounting it in the dash, we’ll be using the bezel and not the adjustable mounting arms. We have space in our dash for it and that way it will be permanent and in place and we don’t have to worry about it sliding around or getting in the way. Like I said, I rarely go in reverse, so we can use it when we need it and not worry about it.
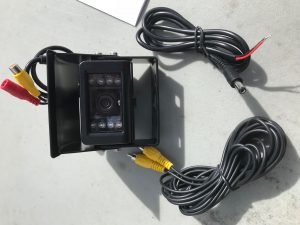
The Camera
For the actual installation, I really recommend putting the camera up first. The camera has a an adjustable mounting bracket with four screws and a shield that goes above the camera to protect it from rain and sunlight washout. There is a single cable that comes out of the rear of the camera, goes through a hole in the mount, and then inside the RV. It also comes with a rubber grommet to both hold the wire in place and keep water out. The connecting wire has three terminals, red for power, yellow for video, and a small switch. Because the three wires join together into a single cable, the hole needs to be large enough for the junction point on the cable which is larger than the three ends separately. I had to drill a hole (and re-drill until it was large to fit the whole thing through, then just slide everything into the interior of the RV.
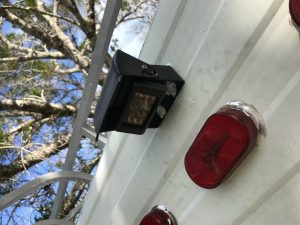
Because we have cabinets in the back inside, the hole was drilled into a cabinet and the wiring is hidden. The wire from the camera is about two feet long, so you can push it inside, pull it tight, push the grommet into the hole in the bracket and then mount the hardware to the outside. The holes for the screws are behind the camera though, so you will have take apart the camera, bracket, and shield, screw the bracket in place and then reassemble. Its easy to do if you have someone else inside to pull the wires through as you tighten everything in place since there is not a lot of room between the back of the camera and the mounting bracket.
After everything is screwed place and tight, put some sealant on it. I use Dicor Self-Leveling Lap Sealant for almost everything and put some in the hole, all around the screws and along the top edge of the bracket before tightening the camera and shield in place. At this point, its pretty easy to tell where the camera is pointed, but since it can be adjusted with a simple Allen wrench, moving it to get the perfect image is easy. With the cable put inside the RV through the hole you drilled, the bracket attached to the outside and camera in place, the easiest part is done.
Running the Cable
The hardest part is then figuring out how to get the long cable from the rear camera to the front monitor. Ours came with a 50 foot cord and we used every foot of it. Our RV is 33 feet long, but since the cable has to go from the top of the RV in back to the dash in front, its not even close to a straight line. We had to backtrack a little bit to get down into the basement, weave through the basement, around the engine, and finally up into the dash. We have an 88 Class A Tiffin Allegro though, so I am not afraid of cutting holes in places and pulling stuff apart to make it work.
When you start running the long cable, make sure you have the ends correct. The yellow cable is the same on both ends, but the red cable is not. It is easiest to plug the correct ends together and then start pulling wire than it is to find out you put it in backwards after doing all the work.
Our path went like this: Through a back cabinet along the outside edge. Down under the cabinet (I didn’t want to mess with going through the breaker box), into a closet. Down next to the grey tank vent pipe into a cabinet below the closet. Through the bottom cabinets (easy as holes were already there for the heating vent hoses), then down through an already existing hole into the basement. Through the basement to the front of the RV. Then zip tied to mounting brackets to keep it out of the way of the front tire and moving engine parts. Finally up through the front of the engine compartment and into the depths of the dash.
With this all done, our 50 foot cable had an extra 14 inches left over so it was exactly the length we needed. Our RV used to have a CRT TV mounted in the dash, so it has a DC power outlet inside the dash and has space in the center for putting in the monitor. I’ll be working on putting something in to cover the hole as we will be adding other things in that center like a few USB ports for charging, a volt meter, a better radio, a GPS, and maybe some other stuff, depending on the space and layout.
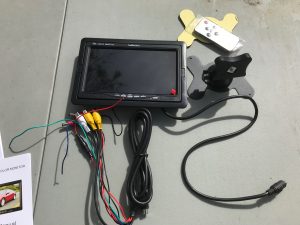
Connecting the Monitor
The monitor has a single cord coming out of it that ends in a connector similar to an S-Video port from older computers. It may very well be an S-video port, but I’m not sure. It does supply power and video, as well as an option to hook the monitor into the drive selector, but it all goes through the one cable.
 |
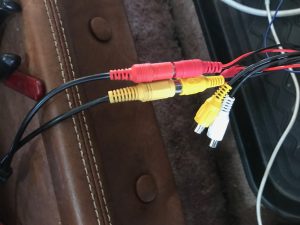 |
To connect the monitor to the camera, there are the red and yellow plugs from the long cable. There is a cable harness that goes between the monitor and the long cable. Plug in the S-Video cable to the monitor. On the other end, there is a red (with inline fuse) and black wire, green wire, blue wire, two yellow connectors, and two red connectors. Connect the red to red (this is the power for the camera), then connect the yellow to the correct yellow. (They are labeled V1 and V2). Make sure if you only have one camera, you connect the yellow V1 to the yellow on the long cable.
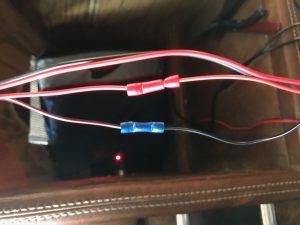
Power
Now you need to connect the power to the whole system. There are two thin wires, red with fuse and black, and then a cigarette lighter adapter with a red and black as well. Connect red to red and black to black using a wire nut. I used the tube style wire joints. Wrap it all in electrical tape for added protection and thats it. Then plug in the adapter and hope it works.
There is a light on the power cord, so when it was plugged in, the light turned on and I knew I had power. The monitor turned on, seemed to be working. One problem though! No video feed. It said “No Signal”. I used the on screen controls (it is not touch screen, but really, there aren’t many options you need anyway). I switched to camera two thinking I had plugged it incorrectly to the wrong yellow feed. Still nothing. I checked all the connections in the dash and it seemed to be correct. Then I went back to where the long cord connects to the camera in the back cabinet and found the problem. At some point while pulling cable, putting everything back into the cabinet, or moving things around, the yellow connector had come apart. Plugged it back in, went back up front and I had an image. 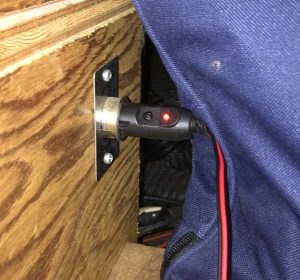
Fortunately, I had managed to aim the camera perfectly and had a good image. I went through the options and found I could reverse the image both horizontally and vertically, but the default image was facing the correct way. There are also options for brightness and volume. The controls are easy to use and pretty straight forward. I have not used the remote, but then, I don’t need to. The camera works, its aimed right, it looks good, so I’ll just leave it as it is.
For image, its great. Its wide enough and the way its positioned I can see enough of the rear bumper to know if I am going to hit something. The monitor has a power switch on it so I can shut it off when I don’t need it. It also has a wire that I can attach to the drive selector so it automatically turns on when I put the RV in reverse, but I have decided to wait on that and see how it works and if I need it first. I’ll also be installing a power switch so I can kill power to both the monitor and camera so its not draining anything from the house batteries when we are stationary for a few weeks. To do that, I’ll just need a simple switch though and put it between the power source and fuse on the power wire.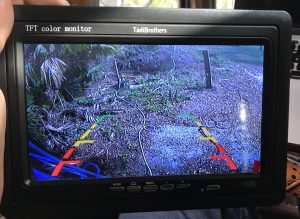
The only remaining thing to do is mount the bezel in our new dash cover so I can lock the monitor in place and have it be at a good height and angle permanently. I’ll be doing that soon though, so I’ll post more photos of the completed installation when its done.
Summary
Drill hole for camera cable, mount cable. Run long cable all the way to the front. Hook red to red, yellow to yellow. Connect to power. Mount display. That’s it!
Purchase this model from Tadi Brothers: RV Backup Camera with Rear View Monitor.
[…] on adding devices. We’ve received five items since I started the Smart Home on Wheels project: Rear View Camera, Satellite Dish, Cell Signal Booster, a macerator, and an inverter/converter. Three of those five […]