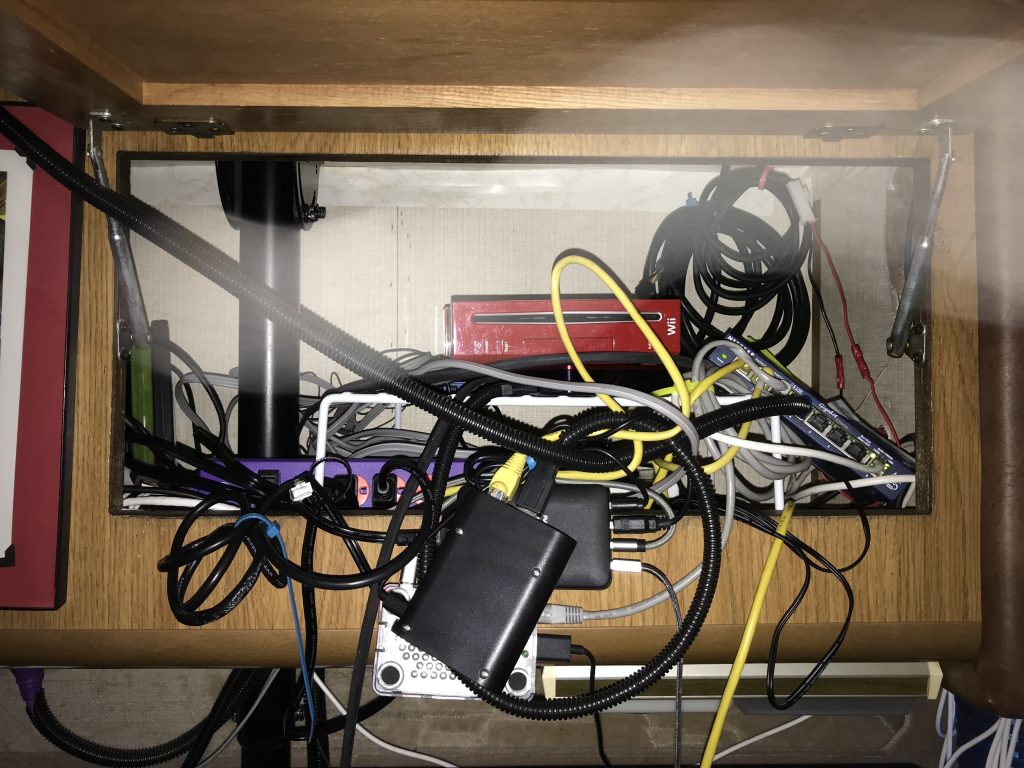
Up above our TV, we have the electronics cabinet. It is filled with, obviously, electronics. As we’ve added new devices, things have just kind of been shoved in there randomly. Wires are all over the place. Raspberry Pis are hanging out haphazardly. It is a mess to say the least.
A few weeks ago, I received a Nintendo Wii from my brother. I plan to toy with it, get some games, have it all set up and play some Wii games on it. I plugged it in, ran the cables, got power to it, and turned on the TV. Except the TV did not turn on. Its completely dead. I tried everything I could think of to get it to work and came up with nothing. Its dead.
The TV is nine years old, so it has had a long life considering the lifespan of most modern electronics. These days, its cheaper to replace something than to repair it and often times the newer stuff is so much better. I contacted my brother again and he has had a 32 inch TV sitting in his home for a couple of months for me, just waiting for me to pick it up and take it away.
Well now that the old TV is deceased, its about time we got that replacement TV.
I contacted my in-laws who will be up here next week, and they are finding a way to get in contact with my brother who will drop the TV off to them, then they will come up here next week since they are coming to get Tiffany anyway, and I’ll take the new TV, give them the old one, and I’ll have a day to set it up since Tiffany will be at her parents for the night. So that solves one problem.
But then there is that rat’s nest of cables…
Its bad, really bad. The TV is mounted on a vertical pole that is bolted through the ceiling and reinforced on the roof with a metal plate. There’s no way its ever moving or coming loose. The pole is hollow and even has channels for allowing cables to be routed through it to connect devices and not have all the cables all over the place. It would have been nice and easy for me to do that originally, but I never did, instead adding and upgrading as we went, shoving things through the hole in the cabinet or ignoring the hole completely and just leaving the door completely open.
Well, now that the TV is coming out, its about time to do something about that tangled mess.
I have shut down all the devices in there and I’m starting to unplug everything. I have one ethernet cable coming in, which goes to the switch that all the devices are connected to. I need to have the TV power cord go up through the pole and plug into the power strip and should be able to run everything else down through the pole to connect to the TV. I will eventually be getting wireless controllers for the RetroPie box, so that eliminates the need for those controllers. I would love it if I could get an HDMI switch of some sort so I didn’t have to run everything down and to the TV, but have it separated and up in the cabinet instead, but that’s a project for another day.
For now, the TV needs inputs from these devices:
- Apple TV: The Apple TV is a third generation model, connected to the network with ethernet and to the TV with HDMI. At the moment, it does need line of sight since the remote is infrared, but we can also use our iPhones to control it which may be easier in the long run. It connects to the various channels we have, Netlflix, YouTube, stuff like that mostly, but I’ve also managed to hack a way for it to connect to the Plex server. It was a bit complicated, but I got it to work regardless. I did end up having to go through all our video files and convert them to a format the Apple TV can play (which took about a week and a half for everything), but its all set now and I’ll just convert everything in the future before adding it to the Plex server.
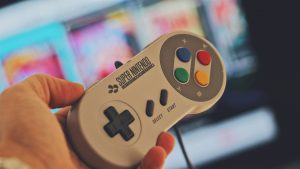
- Nintendo Wii: The Wii for now is nothing. Its not connected to anything, I didn’t have a working TV to use to set it up, so I don’t even know if it works. I’ll be modding it eventually though, adding some functions and apps, but it’ll mostly be just used for playing games. I will probably use a USB to ethernet adapter to connect it to the network, but I already have one so that’s easy enough. I’ll also be adding a hard drive so I can back things up, but I need a USB to SATA case to plug it in. I have the hard drive already as I had one sitting around that I had not gotten rid of, so I can use that and not have to spend too much to get it to work. The other parts I’ve got on hand as well. I may also get a Wii-HDMI adapter for about $10 so I can plug it into HDMI. Its not required, I’m not sure it looks any better, but it will make it easier if everything possible is connected with HDMI. Since the controllers are wireless, there only needs to be the video going to the TV and the sensor bar mounted above it, but I may attach the sensor bar underneath the cabinet instead of on top of the TV so its out of the way.
- RetroPie box: This is my little box of lots of older games. I have two controllers for it now, one is a crappy Playstation controller knockoff, the other is a small SNES controller knockoff. I want to get two 8BitDo SNES controllers since those seem the most reliable, are not too expensive, are completely wireless, and work well with RetroPie. Once I get those, I no longer need a physical cord to connect the controllers to the Pi, so it can be hidden away out of site completely. It is also connected to the TV through HDMI and to the network through ethernet.
- Coaxial: Next week, hopefully the same day the TV is dropped off, we will be getting a HD antenna for review. I will need to hook it up, run some cable, connect it to power, and it should be good to go. That means we will have local television to watch at least, so we can have something on other than YouTube or Netflix all the time. It also means I might be able to watch some NFL games, even though the Green Bay Packers are likely to rarely be on local television. The antenna has a control panel that requires some power and I will probably mount it on the side of the electronics cabinet near the Winegard power switch for the ConnecT 2.0. I assume it is the same color and there is plenty of room there, plus I might be able to tap into the same power line to get enough power for the antenna. I haven’t got it yet though, so I’m not sure how well it will work.
There will be a few other things up in the cabinet and a few other items connecting to the TV eventually.
- I am hoping if all works out, my dad will be able to bring me my Xbox 360 that has been sitting at my sister’s house since last Thanksgiving. We were supposed to go up there for Christmas last year, and well the transmission BS threw a wrench in our plans and we still have not made it up there. If he manages to schedule it right, he’ll stop at her house first, then come down this way so he can bring it with him. I’m hoping so anyway.
- We will eventually get satellite service set up in here when we can afford the monthly cost. It might take a year to be affordable, but I hope we can do it sometime. The satellite dish has been installed and on the roof since February, but well, getting the digital receiver and being able to afford the service every month has been problematic. Once we can afford that, I’ll have to put the box somewhere in the electronics cabinet and figure out how to get video to the bedroom TV as well.
- Maybe one day I’ll get a newer video game system. A Playstation 4 would be awesome, but those are expensive and we can’t buy one now. By the time we can afford one, there will probably be a Playstation 5 on the market so we can just get that. Who knows.
- And finally, I’d eventually like to add a video surveillance system on the outside of our RV. That means adding a computer to control it, share it, record the video, and display it on the TV if we need to. I might do it with a dedicated Raspberry Pi, but I’m not sure quite yet. We’ll figure that out later. I could probably build a monitoring system into it completely as well and add a solar panel and battery for power so it can be running all the time, independent of any power loss just in case someone thinks they can cut our power and remove the security. Its not a huge expense to do all that, but it’s a bit of work to put it all together. When I do get to building that though, I’ll save up enough to build it all at once and not do it piecemeal so it works effectively right from the start.
That should be all that goes up there. I will also have to add a temperature monitor that controls some fans as well and add an intake fan and figure out something better looking for the exit fan, but for now, leaving the front door to the cabinet open is okay. Its not pretty, but it works.
To connect everything together and make it all nice and neat in there, I have a few needs: Power and Ethernet.
Power
Everything runs off electricity, so obviously we need to power everything. Right now, I have a power strip that connects to an outlet under the cabinet, the cable runs up through the hole next to the pole holding the TV, and everything is connected to it eventually. It works, but its not ideal. 
I would instead like to add an electric box inside the cabinet so I can plug everything directly into that. It should be easy enough as the power line already goes through there anyway, just have to add a box with a couple of outlets to plug into. How many outlets do we need to power everything then? TV, Apple TV, Nintendo Wii, network switch, USB power station and that is it for now. That is five power outlets, but there will be things added like the satellite control box, satellite receiver, and Xbox 360 (maybe PS4), as well as a hard drive for the Plex until we can get a NAS set up somewhere else in the RV. Unfortunately, that is a lot of devices to put in there, so instead of adding a lot of outlets, it is probably easier to add one two-outlet box and get a long power strip designed for computer desks to connect everything to. I can find something that can be mounted in place as well and has room for some of the larger power bricks that may be needed.
It should not be difficult to connect a power line to the existing line that runs under the cabinet and put an outlet inside, then use the power strip we have for now and expand later as needed.
Ethernet
Everything needs to be connected to the network as well and I would like as much as possible to be with a hard wired ethernet connection instead of wifi. The Pis (we only have two at the moment but will be adding more) all have built in ethernet. The Apple TV does as well. I currently have my laptop connected to ethernet too at the same switch, but running a cable all over the place to get to the spot where I use it most. I’m going to try and use an USB to ethernet adapter for the Wii, and when/if the Xbox 360 arrives, I’ll connect that with ethernet as well. That’s five devices and on a 8-port switch, one goes to the router leaving us two free ports. That’s fine for now, but its going to need to be upgraded to a 16-port switch eventually. I would like to run an ethernet cable to where our desk is going to be and it will likely be easier to run it from the switch than the router. As we get more Pis and they have their own functions, they’ll need a port as well. 16-port ethernet switches aren’t too much either, so I can get one when I need it.
To connect everything the best though, I want as short an ethernet cable as possible. That means I’m going to have to eventually make my own cables since its cheaper to buy in bulk and make them to the length I need than it is to keep buying new ones. Cable and ends are pretty cheap, and I can get a crimper and tester kit for a low cost as well. I don’t need a high end, expensive professional one, just something simple to make a few dozen terminals. I won’t be making thousands of cables or anything so I don’t need a really expensive one.
I do already have an ethernet cable running up to the electronics cabinet directly from the router. It takes a meandering path through the RV, but it gets there. It is also far too long and there is a bunch of excess down in the basement unit. If I get a crimper and terminal ends, I can go back through, zip tie and wrap that cable so its protected, make it all nice and neat, and shorten it to the length I need. I used what I had on hand and made it work, but I can do better. Even with the excess from just that cable, I can make a few smaller cables for the electronics cabinet, since those can be a foot long or even shorter, just long enough to go from switch to device and that’s it. Ideally, they will be straight, short, and just connecting the two items and that’s it.
And so I got nothing done!
Now, instead of actually organizing the cabinet, I talked about it and didn’t actually do anything. I realized that I’m going to be moving things around, changing things up, disconnecting and reconnecting devices, so it doesn’t make too much sense to go through it all now when I will only be redoing it again soon.
I am going to dissect things now though. Take out what can’t be used now, especially since the TV is dead, and start putting it back in when I get the new TV here and installed. Do it one thing at a time, run the cables, connect them, zip tie them in place, and try to keep some order to it all.
For now though, this is what I have to deal with:
[…] Be sure to take full advantage of board games and card games for that matter. There is an abundance of traditional board games and card games to take advantage of. Nowadays, it’s quick for young kids and adults to simply pick up their phones for entertainment. […]