
I received some products from Henry, namely Tropi-Cool Roof Sealant Products. In a previous review, I applied and tested the Stop Leak Silicone, which has worked well. This time, I tried out the smaller bucket of the whole roof sealant in a target area to learn how to apply it, how to prep for it, and see how well it works.
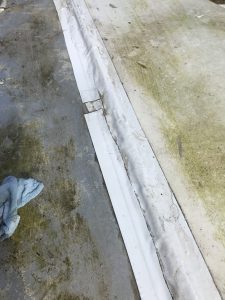 We somehow acquired a small leak up front, so I figured that was a good place to test out the sealant in a small area before applying it to the whole roof. The area I covered had been patched with Eternabond previously, and I chose to go over the Eternabond instead of tearing it off, cleaning it completely underneath, and sealing over the area. Since the leak was likely on the edges of the Eternabond, it seems easiest to cover the edges and work it over the rest of it.
First Impressions
When I opened the can, I was up on the roof. It is pretty heavy for its size, but I assumed what was inside was something of a thick paint-like consistency. It says on the label that it does not need to be stirred prior to use, but I was not expecting what I saw when I opened the lid.
This stuff is thick. Very, very thick.
It is not paint-like, caulk-like, I’m not even sure how to describe how thick it is. It was still in the shape from being extruded into the can and I have no idea how long ago that was. It had not settled even the slightest.
That’s great though as it goes where it is intended and does not run. But since I was expecting something thinner, I only had a foam brush with me even though it recommended a trowel. The next time I apply some, I will definitely be using a trowel or putty knife to put it where it needs to go. That would have been easier to apply and much easier to clean up. I probably would have ended up with less on my hands as well.
Prep Work
To start with, I cleaned the surface where I would be putting down the Tropi-cool. I used a combination of soap and water, followed it up with a nice scrub down and rinse, and made sure it was plenty dry. Some of the stuff on roof will simply not come up, but I’m not sure if it is corrosion, lichen, or just decades of dirt. I got it as clean as I possibly could though, so hopefully it adheres well. I did learn though that after I started applying the Tropi-cool, I did not clean a large enough area and should have cleaned further away from where I was putting it.
Having only the foam brush in hand, I used it to scoop out some of the Tropi-cool and started putting it in place. It goes exactly where want it to go. I put down a gob of it, then spread it out a bit. In areas where there was an edge, I went towards the edge to get it under any crack. Even if I can’t see it, it should be covered. I moved my way across the roof, then went back over it again in areas where it seemed thin.
I made sure it was impossible to tell where the edge of the Eternabond was underneath the Tropi-cool. I had one spot where the Eternabond was not put down properly and had a bubble, so I shoved as much Tropi-cool in there as possible, then put a nice thick layer over the top to completely cover it with one, solid surface. I don’t expect anything to get in there at all.
When I was done, I made a final check to make sure I hadn’t missed any places, touched it up a bit, and now have it drying. It is supposed to thunderstorm overnight, so I’ll check it again before the rain starts to make sure it has hardened enough. We should be able to tell if it has sealed the leak properly as well, assuming it was leaking where I think it was.
Some notes
Like I said, this stuff is thick. Use a trowel or putty knife to put it down. A very thick bristled brush may work, but I’d still prefer something solid and metal.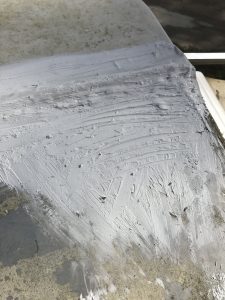
Put more than you think you’ll need. Its easy to move it around after it is down and add to it, so put it where it needs to go and push it around into all the cracks.
Cleanup is kind of difficult. I got some on my hands, and it would not come clean with just water. I had to use a lot of water, followed up with a nice scrubbing with some rags that are going in the trash. I’m not sure if soap would have helped, but the water and rag method did get it almost completely off my hands.
Don’t worry about it running into areas where you do not want it to go. It won’t run anywhere at all. If you dropped a dollop on your roof and left it, it’s likely going to be in the exact same shape in months.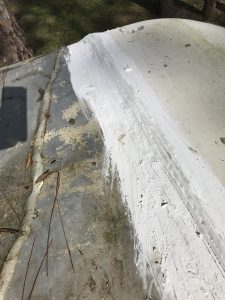
If you are concerned about what your roof looks like, this may not be the product for you. I don’t know if it is possible to make it completely smooth, though using a wet rag to smooth it down may work. But that is going to take a lot of time and effort. I’m not sure the benefit of having a smooth, pretty roof is worth the extra hassle. Besides, who actually looks at the top of other people’s RVs?
If the 5-gallon bucket is the same thickness as the small can, I’m not sure how to apply it properly. I thought it would be easy to do with a paint roller, but it looks like it will be a little more difficult than that.
Does it work?
I can’t say for certain if it sealed the leak, but I’m fairly certain it has. After a few thunderstorms, we’ll have a good measure of how well it held up. I will be posting more updates to follow, as well as an update tomorrow after our thunderstorm tonight to let you know if it did seal the leak we found properly.