
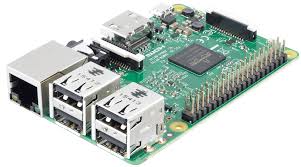
The search for a computer to build as a core unit for the Smart Home on Wheels has been difficult. I spent hours scouring the internet for a solid, small, and useable computer that I could use for the hub. I didn’t want Windows, so that narrowed it down. I would have like a Mac, since the rest of our technology is mostly Apple products, but we can’t afford to buy a new Mac mini right now, and that might be overkill anyway. And that led me to the idea of using the Raspberry Pi. At $35 for one motherboard, we can use more than one and put Raspberry Pi’s everywhere.
 What does that mean exactly? Lets break it down to what technology we require in the Smart Home on Wheels and how we can achieve that with a Raspberry Pi. There are several different things we want to accomplish with this project, and if we dedicated one Pi to each device, we can do it all and it should be all connected and able to view statistics and data remotely at the same time.
There are a few basic items we need to purchase for the Raspberry Pi network. First, we need the Pi’s themselves. For some uses, we can get away with a Pi Zero W. For others, we will need the greater speed and more RAM of the Pi 3. Since the Zero does not have an ethernet port, we’ll mostly use that in places where running ethernet cable would be problematic or the finished device does not need much power. Its much cheaper, so we’ll save money using those where we can. A few devices will need more power and need to be hardwired in for the boost in speed it provides.
Second, we need an SD card for all of them. The smaller units can be done with 8GB microSD cards, but some may need more space. We can get a bunch of 8GB cards pretty cheap, and get some 32GB for the ones with more apps or need to have local storage for whatever reason.
Third, they need power. We are going to run DC power outlets everywhere we put a Pi, but they still need a micro-USB cord to plug in for power.
And lastly, they need cases. I’ll probably just order the same case for all the ones that will be visible, but many of them will be hidden in cabinets and out of the way. They still need cases, but it doesn’t matter what it looks like.
Really, that’s it. I’ll now go through the different tasks we will be using the Pi’s for. This is going to get complex…
Temperature Monitoring

We have cats in our RV. They need to be kept at a comfortable temperature, whether that be not too cold or not to hot. For that reason, we need to have a way to monitor the temperature while we are away from the RV. Fortunately, there is an easy way. We can get one Raspberry Pi Zero W and turn it into a digital, connected thermometer. The Raspberry Pi Zero W & Case can be purchased for a little over $20, but the price fluctuates a lot.
Then we need a thermometer of some sort. That brings us back to Amazon and the DS18B20 Temperature Sensor. It is cheap, has good reviews, and three come in the pack so we can put one outside, one high inside and one low inside to get a good idea since heat rises.
Setting it up completely is a bit complex, but once its set, we shouldn’t need to touch it at all.
Security Cameras
I have to do a lot of research on this one, but it should be possible. The Raspberry Pi 3 has a camera port and they sell both normal and Infrared camera modules. It looks easy to set up and the cable has a cable length of about 18 inches. In theory, I could mount the Pi inside the RV, make a hole, run the camera cable to the outside, and figure out some way to weatherproof it. We could put a few of them around the outside of the RV, and a couple inside so we have full coverage of the RV when we are away. We would then need some way to save that data and video files get really big, really quick. A single terabyte drive is probably the smallest I’d go with, and with the extra processing power of the Pi 3, I’d go with those.
This is a lofty goal though, and will probably wait until later.
Media Server
Next we need a way to stream our media to the TVs, tablets, and computers in our RV. We already use Plex Media Server running on a stick PC that is woefully underpowered. It works, but its not great. Instead of relying on Windows and all the bloat that comes with it, we install Raspbian, add Plex Media Server, and that’s it. Having a wired connection is best for this one, so we go with the Pi 3. We have a 4TB USB drive now, and its about 80% full, so we’ll definitely go with a bigger external hard drive. For longevity, we’ll go with 8TB. To make sure we don’t lose any data, we’ll go with one Seagate 8TB External Hard Drive and one WD 8TB External Hard Drive
. We can set up the Pi to back up one drive to the other, and if we make only one of the drives shared, then we won’t accidentally put data in the wrong place.
The Plex server will probably be in the media cabinet next to the ethernet switch, so the only extra thing we need is a very small ethernet cable.
File Sharing
 We have two MacBooks and macOS has a built in feature called Time Machine. It backs up the computers periodically and keeps backing it up until the drive is full. Since one of the MacBooks has a 500GB SSD and the other a 128GB, we need to have at least 2TB to keep reliable backups far enough into the past for us to use it. I want this to be a dedicated computer for only this function and again it would need to be hard wired to the switch, so a Pi 3 is needed here again. If we went with a slightly larger drive, say 3TB, we would be able to partition it and make 1TB just for saving files we don’t want to lose, but don’t need to keep on our computers. As an added bonus, since we have five OneDrive accounts with our Microsoft account and only use two, we can easily set up a Pi with its own OneDrive account, so the data we store on this drive will be backed up and kept up to date in the cloud.
Smart Home Hub
There are several different companies making different protocol for smart devices, and none of them work together. That’s where the joy that is openHAB comes in. Basically, openHAB takes all the different types of smart appliances and combines them into one software package. Its also open source, free, and updated frequently. I haven never used it, but it looks like it can be complicated to set up and add devices but woks reliably once that is done. OpenHAB even has its own flavor of the default Raspberry Pi OS (Raspbian) called openHABian. Its built off if Raspbian, but has removed some unneeded features and added others to make it wholly dedicated to maintaining a smart home. Since the Smart Home on Wheels project is all about adding whatever technology we can find into an RV, this is priceless.
The smart home hub will have to be a Pi 3. It needs ethernet, faster processor, and more RAM than available on the Pi Zero W. The website states that 32GB is the minimum we should use because there are a lot of add ons and data packs for the multitude of devices out there, but we’ll just go ahead and get a 64GB card just to be safe.

Virtual Private Network
As many people are concerned about internet security, and they should be, we should make one Pi the gateway to the outside world. We can make on Pi 3 the first wall of defense. In our mobile internet setup we usually use a Mobley for internet access while traveling. In our current situation, we have a very complex setup with way too many devices hobbled together to somehow get us online.
We should be able to simplify that a lot with the addition of a Pi 3 as a VPN and the gateway out. With OpenVPN, setting it up is easy, and forwarding the traffic to the other devices should be easy as well. There are plenty of instructions out there to do it, but when we get to that point, I’ll write out my own as some are a bit dated.
And finally…
Core Unit
I haven’t come up with a good name for this one yet, but since we name everything in our RV after Norse mythology, Asgard sounds like a good name. Asgard will be a Pi 3 or maybe even several Pi 3’s. I found a tutorial that walks readers through the steps to take several Pi’s and link them together into one single computer. Since Asgard will be needing a lot more power than the rest of the system, it would make sense to couple a few together and make one SuperPi. There are even several cases for multiple Pi’s, but I like the Raspberry Pi 3 4-Unit Stack Case the best. While this takes up a lot of ethernet ports on the switch, the added power of having four Pi’s working together would be critical.

But why?
Asgard needs to be more powerful than the rest of the setup because it will be dedicated to handling all the data from the other Pi’s and sending it out to the internet. I could set up Apache web server on it and have it host a web page, but that has one key problem: IP addresses change frequently. Since we are connected almost always through an LTE modem, the IP changes a lot. If we wanted to connect to the Apache, we would have to know the IP address of the network and have port forwarding to send the request to the Asgard cluster. That is not ideal in any way. We can do better than that.
I’ve been building web pages for about twenty years, they are the core skill I fall back on when I need to. I also have a few web pages I work on daily, including this one. I can host a page on anyone of those remote servers and have Asgard upload data to it. Maybe every five minutes or so, Asgard sends the new data, like temperature and a single photo from each camera. If I build the web page right using PHP and MySQL, I will be able to click on a “temperature” link and see the current temperature and a graph showing where it was previously and tracking it all.
With the video, we could see the current still shot of each camera at once, and then click on each camera to get a video feed directly to that camera. With a little bit of work, I may be able to access the media server or file server remotely as well, especially with the VPN in place.
Raspberry Pi’s Everywhere!
Now, where does that leave us? For this setup, we need eight Raspberry Pi 3’s (maybe more), and just one Raspberry Pi Zero W. We need two 8TB external hard drives, and one 3TB external hard drive. One pack of three temperature monitors. One external wifi USB antenna. Then we need a whole mess of microSD cards, with one for each Pi. We also need a ton of cat5, so much so that it might be wise to invest in a cable tester and crimper. We also need one micro-USB cable per Pi for power. We already have enough HDMI cables, and really, we only need one since we won’t need to access more than one at a time and we will be remotely accessing them once the base OS is installed anyway.
The final step is getting everything together, networking it properly, writing the code to make Asgard talk to the web server, and really, that’s about it. I don’t think we need much of anything else, and we’ll be upgrading these a little at a time until complete. There will also be other things we need, I may find a use for more Pi Zero W’s as cameras around and inside the RV. As we proceed, I will do one Pi per post and let you know how to set up each individually and then finally all together.
If you’d like to help with this project, we have a wish list at Amazon with everything included. Since we are funding this ourselves, it’ll take time to get everything together, but when its done, it’ll be Raspberry Pi’s everywhere!

[…] you have read the previous post, I laid out the foundations for a very robust system. It sounded great on paper, but in […]